
Before you startশুরুর আগে
You only need two free accounts:
শুধু দুটি ফ্রি অ্যাকাউন্ট লাগবে:
Your data stays yours. The generator runs only in your browser. Your Google secret and token go straight to Google, never to xKAF.
আপনার তথ্য আপনারই থাকে। জেনারেটর শুধু আপনার ব্রাউজারে চলে। Google secret ও token সরাসরি Google-এ যায়, কখনো xKAF-এ না।
1Create a Google Cloud projectGoogle Cloud project তৈরি করুন
- Open console.cloud.google.com/projectcreate.
- Type any name (for example
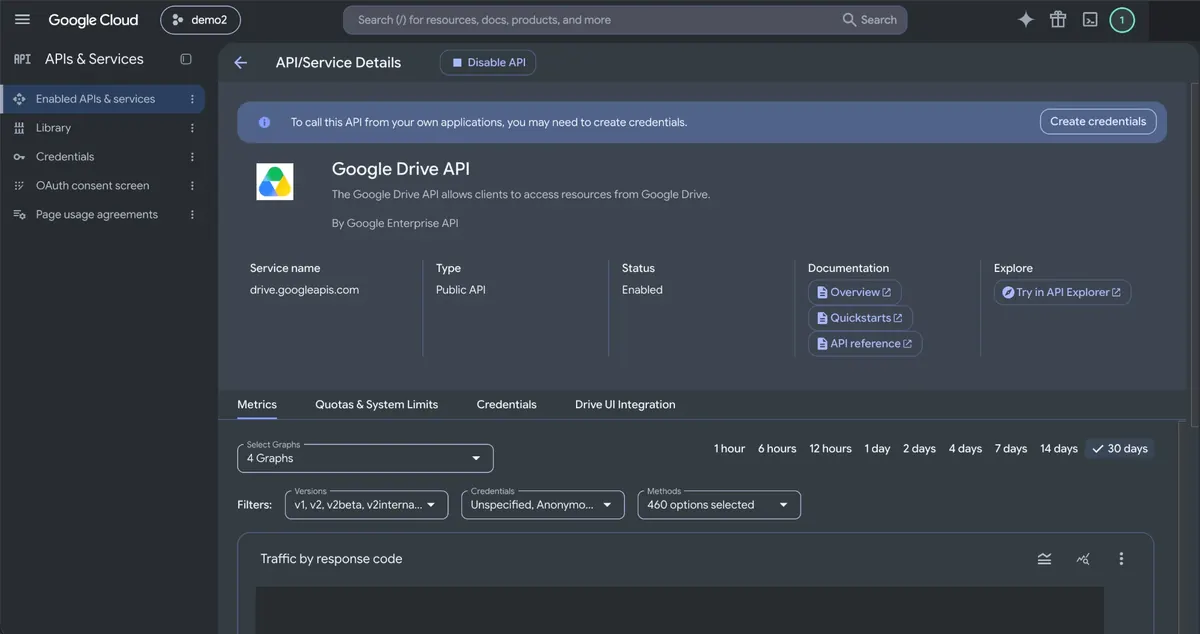
my-mirror) and click Create. - Make sure the new project is selected at the top, then open the Google Drive API page and click Enable.
- console.cloud.google.com/projectcreate খুলুন।
- যেকোনো নাম দিন (যেমন
my-mirror), তারপর Create চাপুন। - উপরে নতুন project সিলেক্ট আছে কিনা দেখে নিন। তারপর Google Drive API পেজে গিয়ে Enable চাপুন।
Free. Google does not ask for a card for this.
সম্পূর্ণ ফ্রি। এর জন্য Google কোনো কার্ড চায় না।
2Set up the consent screenConsent screen সেটআপ করুন
- After Enable, Google opens the Google Drive API details page (it has a Create credentials button). Don't use that button. Click OAuth consent screen in the left menu, or open Google Auth Platform.
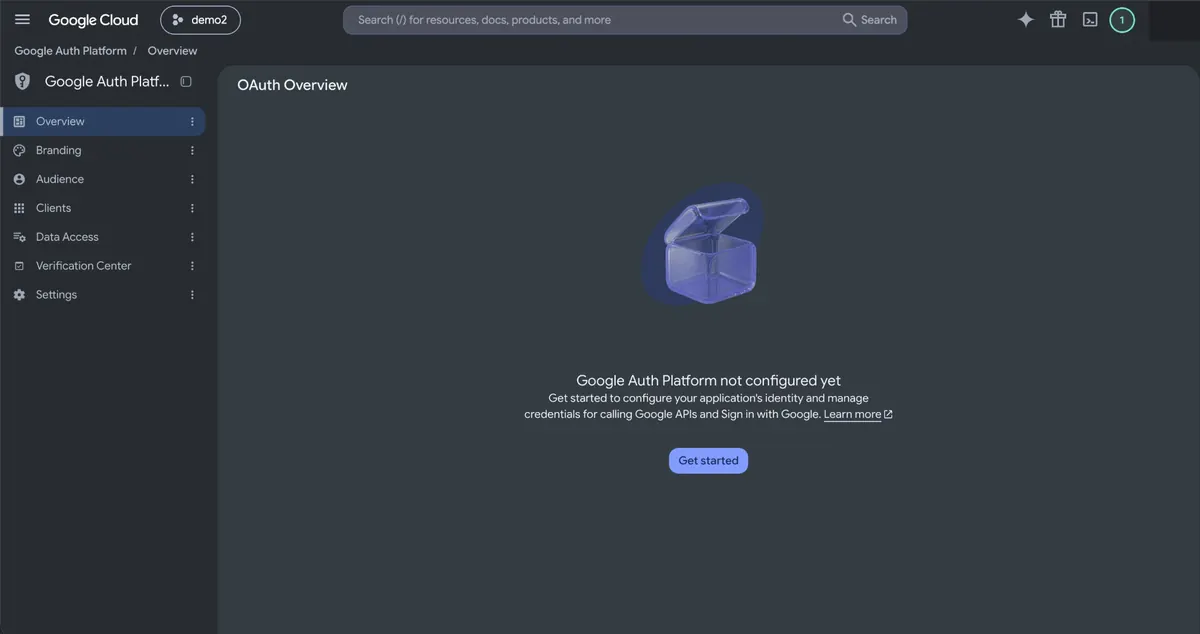
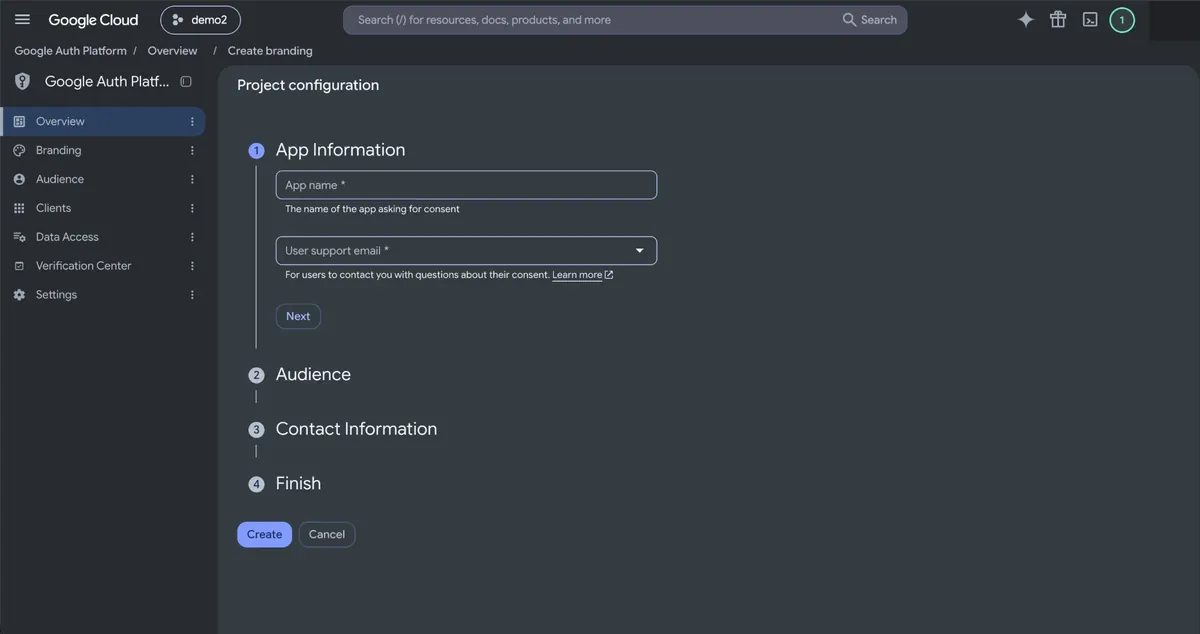
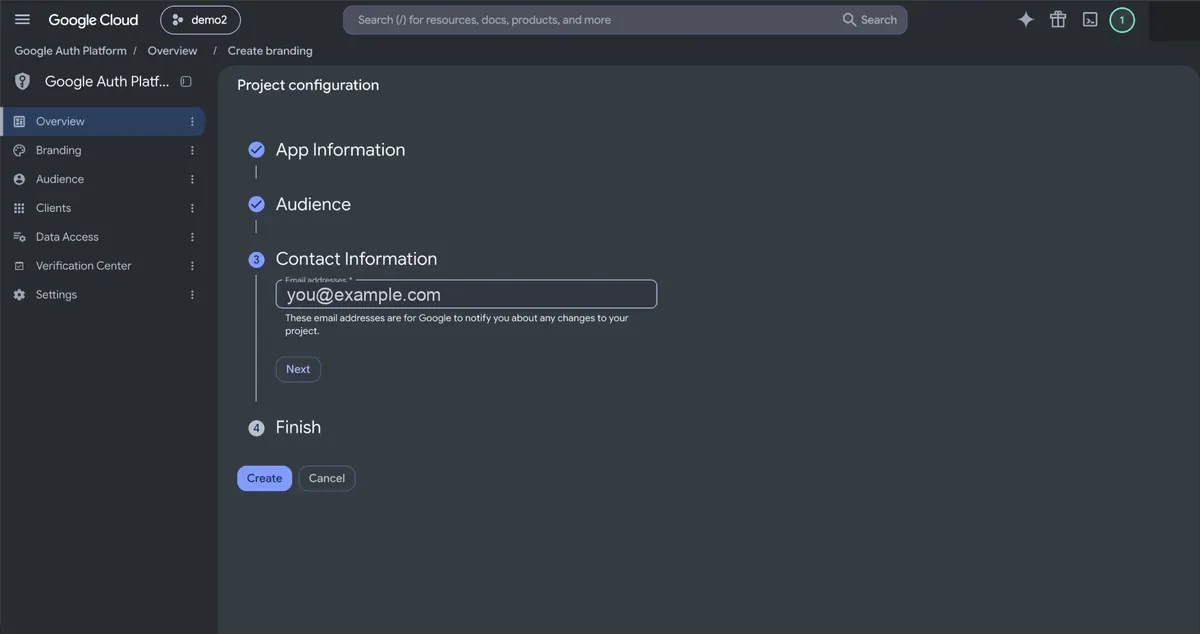
- If you see Get started: enter an app name (anything), pick your email as User support email, choose External, add your email as contact, accept the policy and click Create.
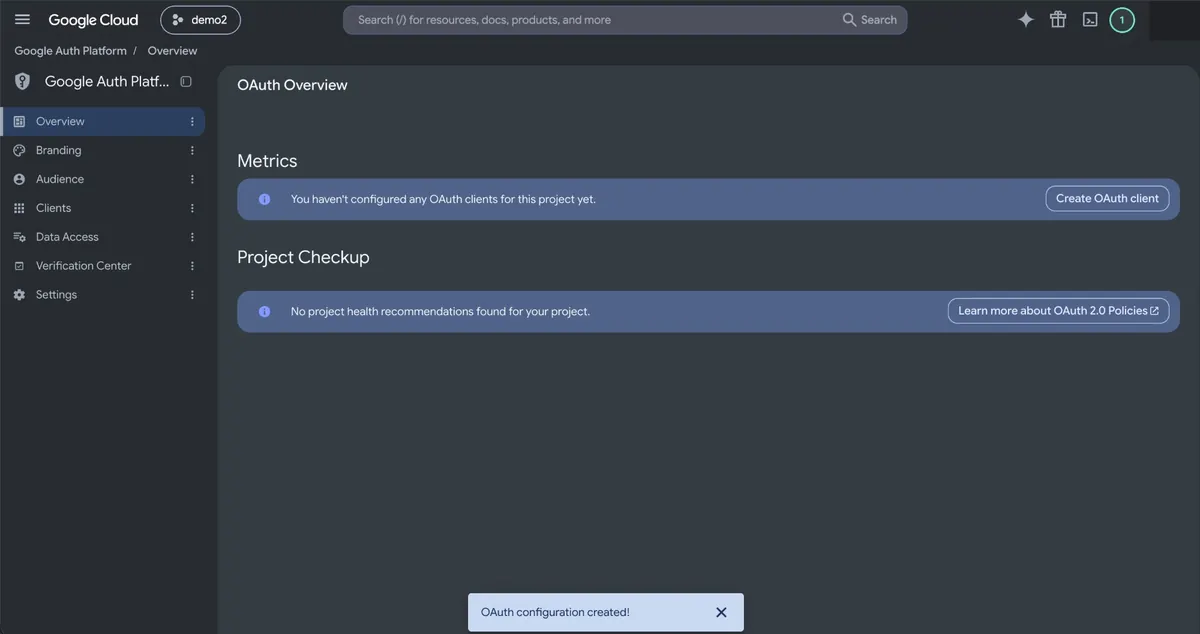
If you see an Overview page instead, the app is already set up. Go on to the next step. - Open Branding and fill in the App domain links below. Leave App logo empty: a logo forces Google's verification review.
| Application home page | https://gmirror.xkaf.org/ |
| Application privacy policy link | https://gmirror.xkaf.org/privacy.html |
| Application terms of service link | leave emptyখালি রাখুন |
| Authorized domain 1 | xkaf.org |
- Click Save at the bottom of Branding.
- Open Audience, click Publish app, then Confirm. Publishing status must say In production. You don't need to add test users.
- Enable চাপার পর Google Google Drive API-এর details পেজ খোলে (সেখানে Create credentials বাটন থাকে)। ওই বাটন চাপবেন না। বাম মেনুতে OAuth consent screen চাপুন, অথবা Google Auth Platform খুলুন।
- Get started দেখালে: একটি app name (যেকোনো) দিন, User support email-এ আপনার email বেছে নিন, External বেছে নিন, contact হিসেবে আপনার email দিন, policy মেনে Create চাপুন।
Get started-এর বদলে Overview পেজ দেখালে app আগেই সেটআপ হয়ে গেছে। পরের ধাপে যান। - Branding খুলে নিচের App domain লিংকগুলো দিন। App logo খালি রাখুন: logo দিলে Google-এর verification review লাগে।
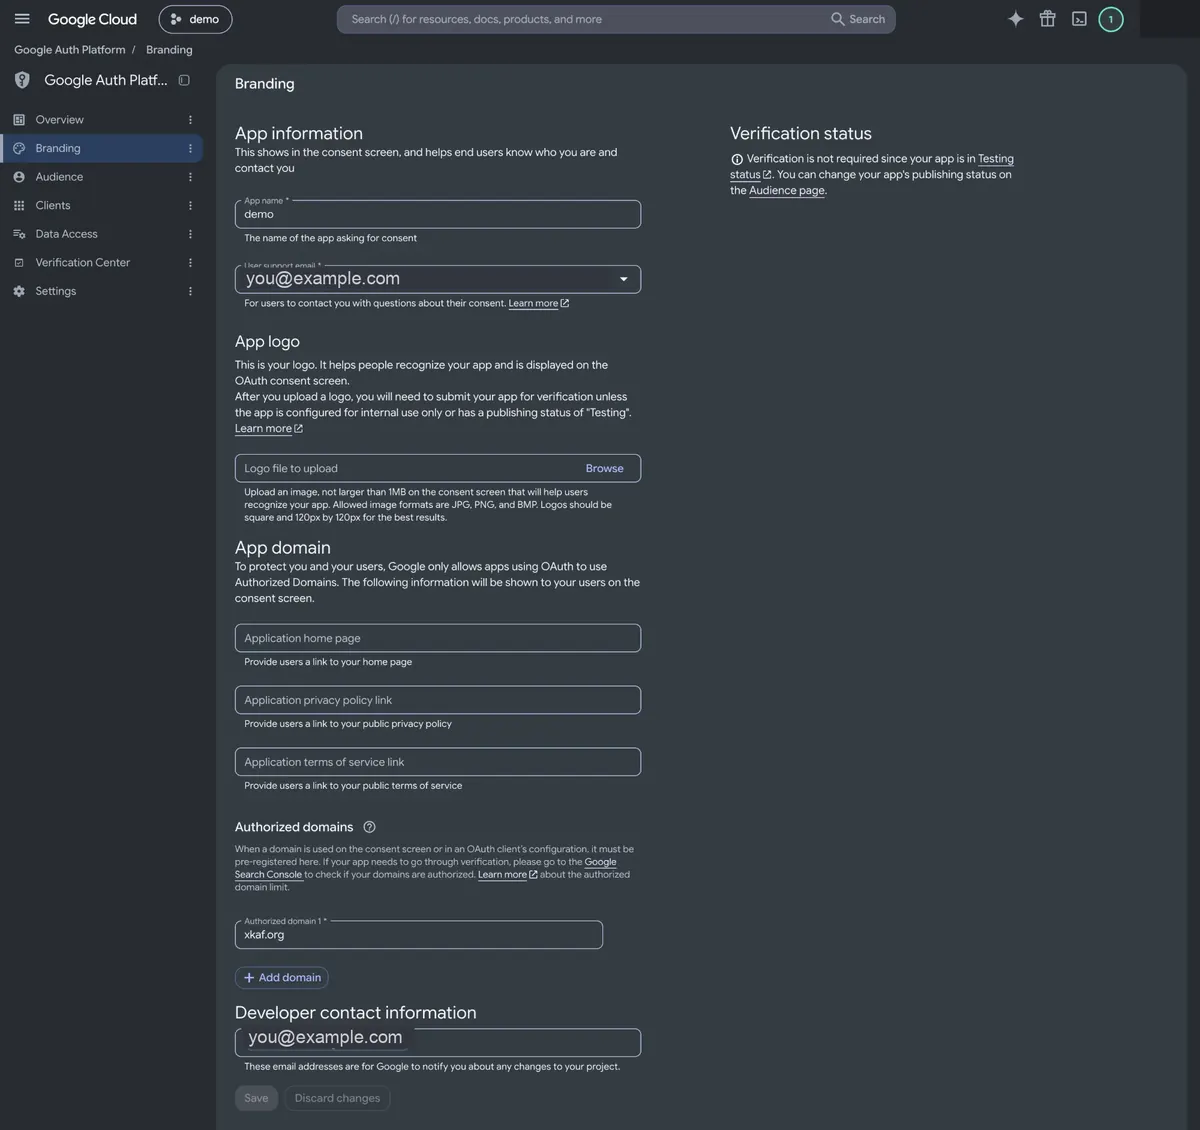
- Branding-এর নিচে Save চাপুন।
- Audience খুলে Publish app, তারপর Confirm চাপুন। Publishing status-এ অবশ্যই In production দেখাতে হবে। Test user যোগ করার দরকার নেই।
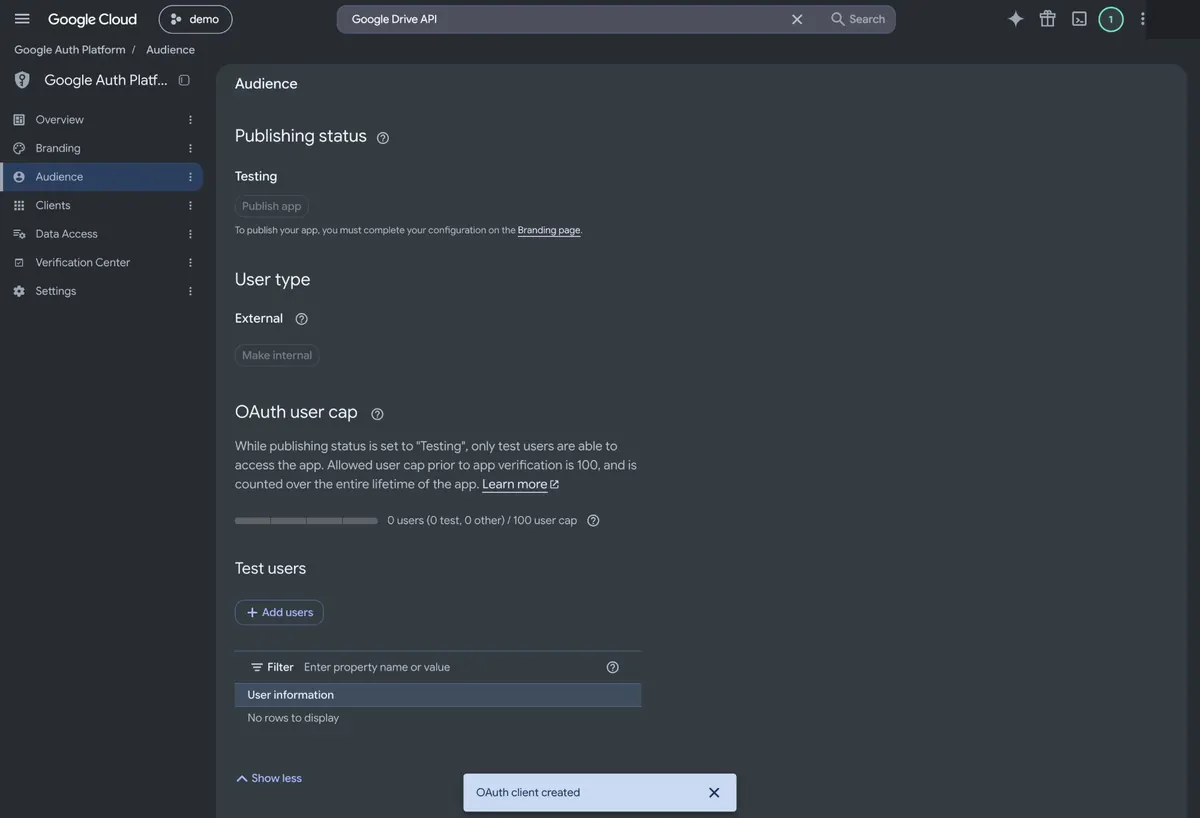
Don't skip “Publish app”. If the app stays in Testing, Google stops your token after 7 days and the mirror stops working.
“Publish app” বাদ দেবেন না। App Testing-এ থাকলে ৭ দিন পর Google token বন্ধ করে দেয়, আর মিরর কাজ করা বন্ধ করে।
“Publish app” is greyed out? Audience says “you must complete your configuration on the Branding page” until Branding has a home page and a privacy policy link on an authorized domain. Fill in the table above, click Save, then reload Audience.
“Publish app” ধূসর হয়ে আছে? Branding-এ authorized domain-এর home page আর privacy policy লিংক না দেওয়া পর্যন্ত Audience-এ “you must complete your configuration on the Branding page” দেখায়। উপরের টেবিল মতো পূরণ করে Save চাপুন, তারপর Audience রিলোড করুন।
Already clicked “Create credentials”? That's fine. It sets up the app and a client for you, so there is no Get started any more. Still do Branding and Publish app above. Then, in step 3, open that client under Clients and check its redirect URI instead of creating a new one.
আগেই “Create credentials” চেপে ফেলেছেন? সমস্যা নেই। এতে app আর একটি client তৈরি হয়ে যায়, তাই Get started আর দেখায় না। তবুও উপরের Branding আর Publish app করুন। তারপর ধাপ ৩-এ নতুন client না বানিয়ে Clients-এ ওই client খুলে redirect URI ঠিক আছে কিনা দেখুন।
3Create the OAuth clientOAuth client তৈরি করুন
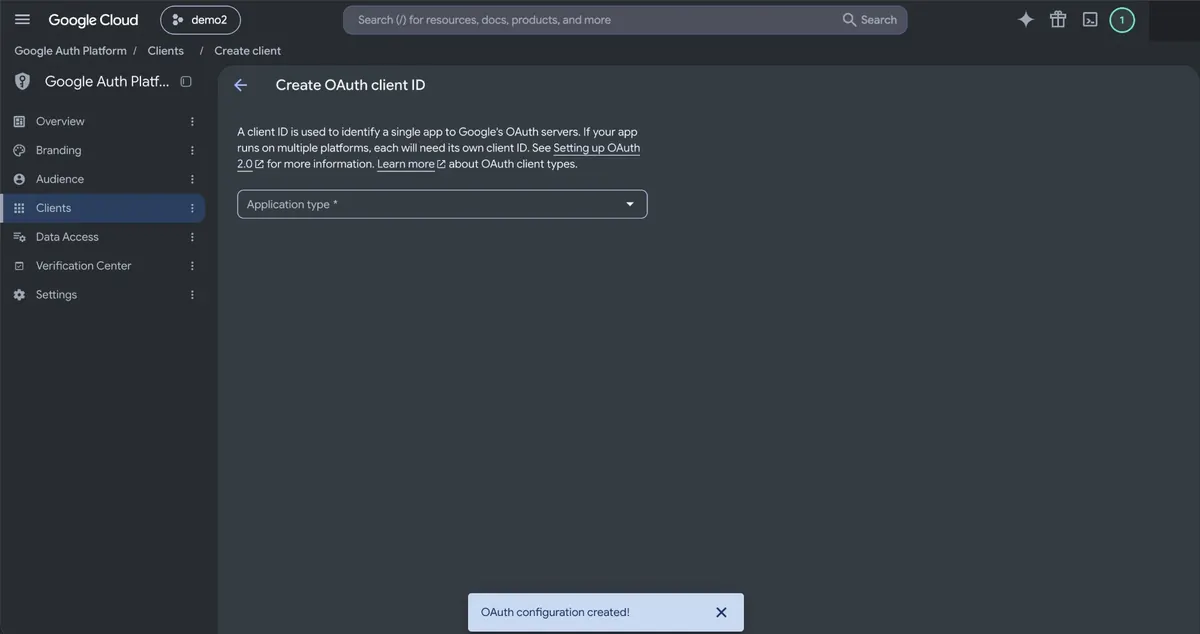
- In Google Auth Platform open Clients → Create client (or click Create OAuth client on the Overview page).
- Application type: Web application.
- Under Authorized redirect URIs click Add URI and paste exactly:
- Google Auth Platform-এ Clients → Create client খুলুন (অথবা Overview পেজের Create OAuth client চাপুন)।
- Application type: Web application।
- Authorized redirect URIs-এ Add URI চাপুন এবং হুবহু এটি পেস্ট করুন:
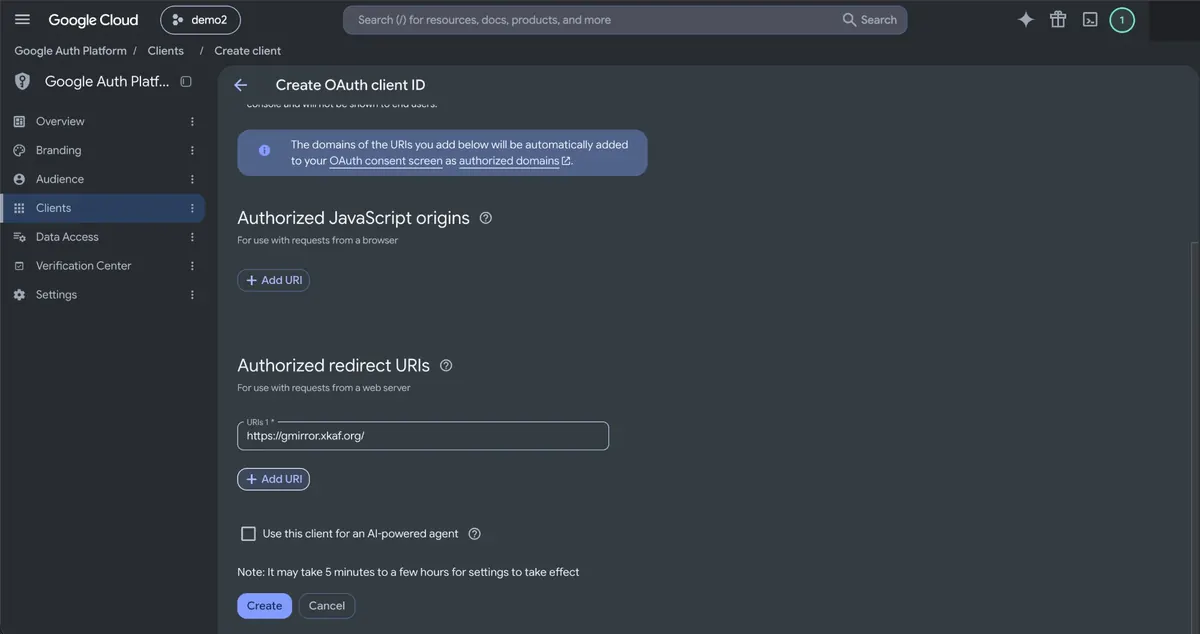
https://gmirror.xkaf.org/
- Click Create. Copy the Client ID and Client secret right away (or click Download JSON). You will paste them into the generator. Google shows the secret only in this dialog; if you lose it, open the client and click Add secret.
- Create চাপুন। সাথে সাথে Client ID আর Client secret কপি করুন (অথবা Download JSON চাপুন), জেনারেটরে লাগবে। Secret শুধু এই dialog-এ একবার দেখায়; হারিয়ে গেলে client খুলে Add secret চাপুন।
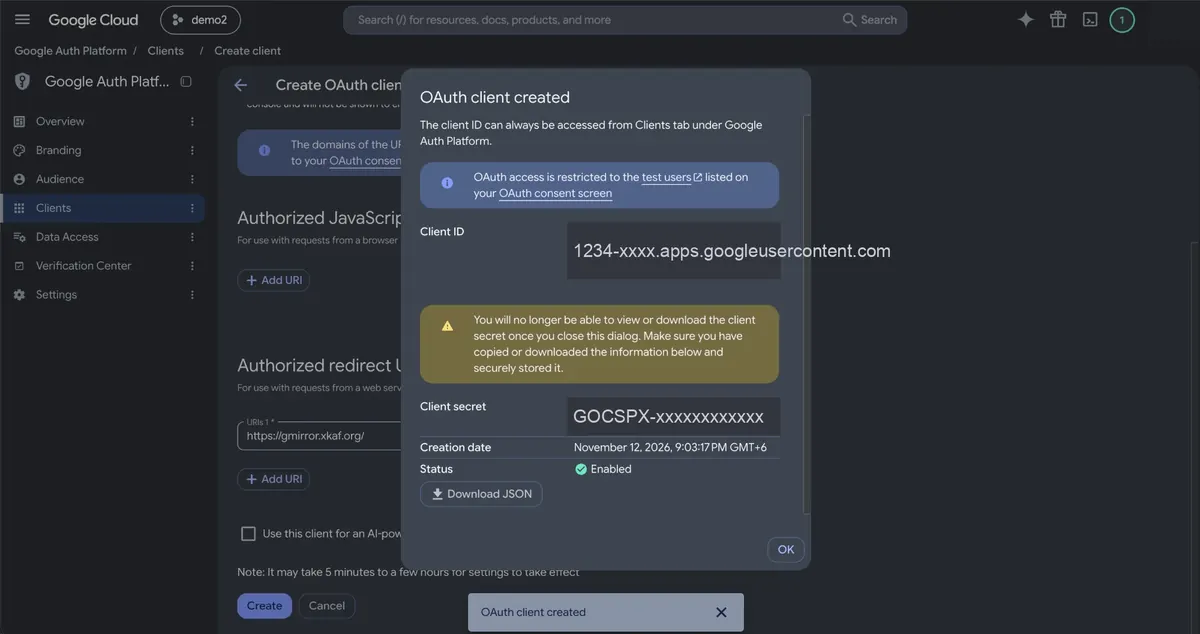
The trailing / matters. A missing slash causes the redirect_uri_mismatch error.
শেষের / জরুরি। এটা না দিলে redirect_uri_mismatch error আসে।
4Build your worker.jsworker.js তৈরি করুন
Open the generator and go through the five steps:
জেনারেটর খুলে পাঁচটি ধাপ পূরণ করুন:
- Google login: paste the Client ID and secret, keep Read-only, click Sign in with Google and allow access. Google may show “Google hasn't verified this app”: click Advanced → Go to … (unsafe). That is normal, because it is your own app.
- Drives: click Load my Shared Drives, or add My Drive, or paste any folder link. Give each a name. A password is optional.
- Site look: title, description and colors. You can change them later.
- Security: set an admin password so you can use
/adminlater. Leave the rest as it is if unsure. - Download: click Generate worker.js and download the file.
- Google লগইন: Client ID আর secret বসান, Read-only রাখুন, Google দিয়ে সাইন ইন চেপে অনুমতি দিন। Google “Google hasn't verified this app” দেখাতে পারে: Advanced → Go to … (unsafe) চাপুন। এটা স্বাভাবিক, কারণ app-টা আপনার নিজের।
- ড্রাইভ: Shared Drive লোড করুন চাপুন, অথবা My Drive বা যেকোনো ফোল্ডার লিংক যোগ করুন। প্রতিটির নাম দিন। পাসওয়ার্ড ঐচ্ছিক।
- সাইটের রূপ: নাম, বিবরণ আর রং। পরে বদলানো যাবে।
- নিরাপত্তা: একটি admin পাসওয়ার্ড দিন, যাতে পরে
/adminব্যবহার করতে পারেন। নিশ্চিত না হলে বাকি সব যেমন আছে রাখুন। - ডাউনলোড: worker.js তৈরি করুন চেপে ফাইলটি ডাউনলোড করুন।
Keep worker.js private. It contains your Google credentials. Never post it publicly or upload it to a public code repository.
worker.js গোপন রাখুন। এতে আপনার Google credentials আছে। কখনো পাবলিকলি শেয়ার বা পাবলিক কোড রিপোজিটরিতে আপলোড করবেন না।
5Deploy on Cloudflare WorkersCloudflare Workers-এ deploy করুন
- Log in to Cloudflare → Workers & Pages → Create.
- Choose Create Worker (Start with Hello World), give it a name like
my-mirror, click Deploy. - Click Edit code. Select all the sample code, delete it, paste your whole
worker.js. - Click Deploy. Open the
….workers.devlink. Your mirror is live!
- Cloudflare → Workers & Pages → Create-এ লগইন করুন।
- Create Worker (Start with Hello World) বেছে নিন,
my-mirror-এর মতো একটি নাম দিয়ে Deploy চাপুন। - Edit code চাপুন। নমুনা কোড সব সিলেক্ট করে মুছে দিন, তারপর পুরো
worker.jsপেস্ট করুন। - Deploy চাপুন।
….workers.devলিংকটি খুলুন। আপনার মিরর চালু!
Prefer the command line? (Wrangler)
কমান্ড লাইন পছন্দ? (Wrangler)
Put worker.js in a folder with this wrangler.toml:
worker.js-এর পাশে এই wrangler.toml ফাইলটি রাখুন:
name = "my-mirror"
main = "worker.js"
compatibility_date = "2025-06-01"

[[kv_namespaces]]
binding = "XKAF_KV"
id = "PASTE_KV_ID_HERE"
npm i -g wrangler
wrangler login
wrangler kv namespace create XKAF_KV   # paste the id into wrangler.toml
wrangler deploy
6Add KV storage (recommended)KV storage যোগ করুন (প্রস্তাবিত)
KV lets you edit settings live from /admin and see download statistics.
KV থাকলে /admin থেকে সরাসরি সেটিং বদলানো যায় আর ডাউনলোড পরিসংখ্যান দেখা যায়।
- In Cloudflare go to Storage & Databases → KV → Create. Any name is fine.
- Open your Worker → Settings → Bindings → Add → KV namespace.
- Variable name:
XKAF_KV(exactly). Pick the namespace you just made. Deploy.
- Cloudflare-এ Storage & Databases → KV → Create-এ যান। যেকোনো নাম দিন।
- আপনার Worker খুলে Settings → Bindings → Add → KV namespace-এ যান।
- Variable name হুবহু
XKAF_KVদিন। এইমাত্র বানানো namespace বেছে নিয়ে Deploy চাপুন।
7Use your own domain (optional)নিজের ডোমেইন ব্যবহার (ঐচ্ছিক)
- Your domain must be added to the same Cloudflare account.
- Open your Worker → Settings → Domains & Routes → Add → Custom domain.
- Type e.g.
files.example.comand click Add domain. DNS and SSL are set up for you within a few minutes.
- আপনার ডোমেইন একই Cloudflare অ্যাকাউন্টে যুক্ত থাকতে হবে।
- Worker খুলে Settings → Domains & Routes → Add → Custom domain-এ যান।
- যেমন
files.example.comলিখে Add domain চাপুন। কয়েক মিনিটে DNS আর SSL নিজে থেকেই সেট হয়ে যাবে।
8Manage it from /admin/admin থেকে পরিচালনা
Open https://your-mirror/admin and log in with your admin password. From there you can:
https://your-mirror/admin খুলে admin পাসওয়ার্ড দিয়ে লগইন করুন। সেখান থেকে আপনি পারবেন:
- Add, rename, hide or password-protect drives
- Change title, colors, logo, announcement banner and homepage text
- Turn features on or off (search, video player, previews…)
- See download statistics, purge the cache, back up settings
- ড্রাইভ যোগ, নাম বদল, লুকানো বা পাসওয়ার্ড দেওয়া
- নাম, রং, লোগো, ঘোষণা ব্যানার আর হোমপেজ লেখা বদলানো
- ফিচার চালু/বন্ধ করা (সার্চ, ভিডিও প্লেয়ার, প্রিভিউ…)
- ডাউনলোড পরিসংখ্যান দেখা, cache purge করা, সেটিং ব্যাকআপ নেওয়া
Lock a single folder: put a file named .password inside it. The text in that file becomes the folder's password.
একটি ফোল্ডার লক করতে: ফোল্ডারের ভিতরে .password নামে একটি ফাইল রাখুন। ফাইলের লেখাটাই হবে ফোল্ডারের পাসওয়ার্ড।
Advanced: keep secrets out of the codeঅ্যাডভান্সড: কোডের বাইরে secret রাখা
Tick Keep secrets out of the code in step 4 if you store worker.js in Git. The generator then shows values to add in your Worker under Settings → Variables and Secrets → Add → Secret:
worker.js Git-এ রাখলে ধাপ ৪-এ কোডের বাইরে secret রাখুন টিক দিন। জেনারেটর তখন কিছু মান দেখাবে, যেগুলো Worker-এর Settings → Variables and Secrets → Add → Secret-এ যোগ করবেন:
| Secret | What it isএটা কী |
|---|---|
CLIENT_SECRET | Your Google client secretআপনার Google client secret |
REFRESH_TOKEN | Token from the Google sign-inGoogle সাইন ইন থেকে পাওয়া token |
SESSION_SECRET | Random value that signs cookies and linksকুকি ও লিংক সাইন করার random মান |
ADMIN_PASSWORD | Optional: admin password (overrides the one in code)ঐচ্ছিক: admin পাসওয়ার্ড (কোডেরটার বদলে এটা চলবে) |
Updating to a new versionনতুন ভার্সনে আপডেট
Settings saved in /admin live in KV and survive updates. The easiest way:
/admin-এ সেভ করা সেটিং KV-তে থাকে, আপডেটে মুছে যায় না। সবচেয়ে সহজ উপায়:
- In
/admin → Backup, click Download settings.json. - Generate a fresh
worker.jshere and paste it into your Worker (Edit code → Deploy). - If anything is missing, use Import JSON in
/admin → Backupand press Save.
/admin → Backup-এ Download settings.json চাপুন।- এখানে নতুন করে
worker.jsতৈরি করে Worker-এ পেস্ট করুন (Edit code → Deploy)। - কিছু হারিয়ে গেলে
/admin → Backup-এ Import JSON দিয়ে ফাইলটি দিন, তারপর Save চাপুন।
Problems & fixesসমস্যা ও সমাধান
“Error 400: redirect_uri_mismatch”“Error 400: redirect_uri_mismatch”
The redirect URI in your Google client is not exactly https://gmirror.xkaf.org/. Fix it in Clients, save, wait a minute and try again.
Google client-এ redirect URI হুবহু https://gmirror.xkaf.org/ নয়। Clients-এ ঠিক করে সেভ করুন, এক মিনিট অপেক্ষা করে আবার চেষ্টা করুন।
“Google did not return a refresh token”“Google did not return a refresh token”
Remove the app at myaccount.google.com/permissions, then sign in again in step 1.
myaccount.google.com/permissions থেকে app-টি সরিয়ে দিন, তারপর ধাপ ১-এ আবার সাইন ইন করুন।
“Publish app” is greyed out“Publish app” ধূসর হয়ে আছে
In Branding, set the home page to https://gmirror.xkaf.org/, the privacy policy to https://gmirror.xkaf.org/privacy.html and authorized domain xkaf.org, then Save and reload Audience (step 2).
Branding-এ home page https://gmirror.xkaf.org/, privacy policy https://gmirror.xkaf.org/privacy.html আর authorized domain xkaf.org দিন, তারপর Save চেপে Audience রিলোড করুন (ধাপ ২)।
The mirror stopped working after about a weekপ্রায় এক সপ্তাহ পর মিরর কাজ করছে না
Your app was still in Testing. Click Publish app (step 2), create a new worker.js and deploy it again.
আপনার app তখনো Testing-এ ছিল। Publish app চাপুন (ধাপ ২), তারপর নতুন worker.js বানিয়ে আবার deploy করুন।
“Access blocked” or “This app is blocked”“Access blocked” বা “This app is blocked”
Usually the app is still in Testing with no test users. Open Audience: if Publish app is greyed out, finish Branding first (step 2), then publish. Also make sure Audience is External and the Google Drive API is enabled in the same project as your client.
সাধারণত app তখনো Testing-এ থাকে এবং কোনো test user নেই। Audience খুলুন: Publish app ধূসর থাকলে আগে Branding শেষ করুন (ধাপ ২), তারপর publish করুন। আর Audience External আছে কিনা, এবং একই project-এ Google Drive API enabled কিনা দেখে নিন।
Files show but downloads fail with 403ফাইল দেখা যায়, কিন্তু ডাউনলোডে 403 আসে
Google limits very popular files for a while (quota). Wait some hours, or copy the file again in Drive so it gets a fresh quota.
খুব জনপ্রিয় ফাইলে Google কিছু সময়ের জন্য সীমা দেয় (quota)। কয়েক ঘণ্টা অপেক্ষা করুন, অথবা Drive-এ ফাইলটির নতুন কপি বানান।
/admin says “No KV namespace is bound”/admin-এ “No KV namespace is bound” দেখাচ্ছে
Add the KV binding named exactly XKAF_KV (step 6) and deploy again.
হুবহু XKAF_KV নামে KV binding যোগ করুন (ধাপ ৬) এবং আবার deploy করুন।
I changed files in Drive but the site shows old onesDrive-এ ফাইল বদলেছি, কিন্তু সাইটে পুরনোটা দেখাচ্ছে
Listings are cached for a short time. Use Purge all caches in /admin to refresh right away.
লিস্ট কিছুক্ষণ cache থাকে। সাথে সাথে আপডেট পেতে /admin-এ Purge all caches চাপুন।
Cloudflare free plan limitsCloudflare ফ্রি প্ল্যানের সীমা
| Limitসীমা | What it means for youআপনার জন্য এর মানে |
|---|---|
| 100,000 requests / dayদিনে ১,০০,০০০ request | A page view is about 2 requests. A download is 1, whatever the file size.একটি পেজ ভিউ প্রায় ২টি request। একটি ডাউনলোড ১টি, ফাইল যত বড়ই হোক। |
| 10 ms CPU / requestপ্রতি request-এ ১০ ms CPU | Files are streamed straight through, so big files are fine.ফাইল সরাসরি stream হয়, তাই বড় ফাইলেও সমস্যা নেই। |
| KV: 1,000 writes / dayKV: দিনে ১,০০০ write | The mirror writes rarely (stats every few minutes, admin saves).মিরর খুব কম write করে (কয়েক মিনিট পর পর stats, admin সেভ)। |